

Developing a 2FA Desktop Client in Go

Welcome back! Long ago I made a video about Wails, which is a framework/library to develop desktop or cross-platform apps in Go. And recently I wanted to revisit this project, because I wanted to build a local desktop 2FA Authenticator App, similar to Google/Microsoft Authenticator and others.
I was hoping that I could try the latest version 3, but it’s not yet released. But that shouldn’t be a problem as v2 is more than enough to create a lightweight desktop app.
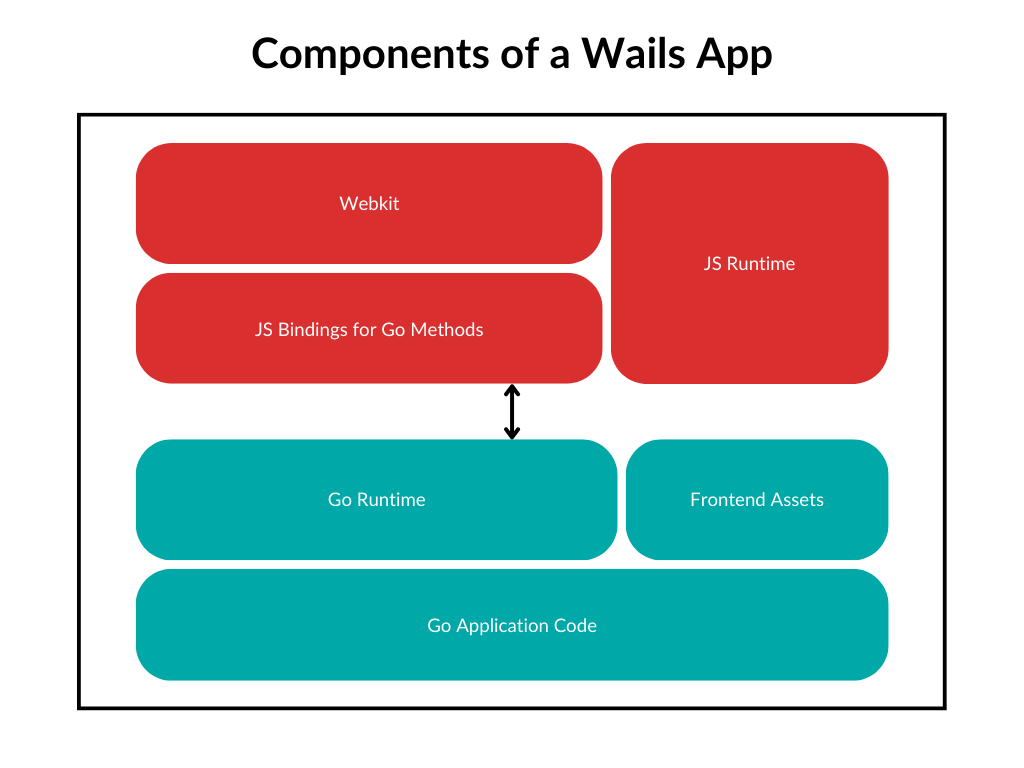
Short recap of how Wails works, I won’t Go into the details, you can check it yourself:
A Wails application is a standard Go application, with a webkit frontend. It is possible to bind Go methods to the frontend, and these will appear as JavaScript methods that can be called, just as if they were local JavaScript methods.
Quite handy right? You can write desktop applications in Go. In terms of the frontend the following options are available:
Svelte
React
Vue
Preact
Lit
Vanilla
Also, it’s not Electron, it’s more lightweight and fast!
Could we vibe-code our 2FA App in under an hour with AI assistance? - Probably.
But would we actually learn how 2FA works? - No.
So let’s build this properly, understanding every piece, that’s the way of this newsletter.
How 2FA actually works
We all used 2FA apps.
Before we write a single line of code, we need to understand what we’re actually building. Most tutorials skip this part and just import a library. But that’s not how we learn.
When you enable 2FA, the server generates a random secret - just a long random string. This secret is shared ONCE between the server and your authenticator app, usually via QR code, in base32 format.
Example Secret JBSWY3DPEHPK3PXP (without padding)
Both the server and your app now have this secret. The server stores it in their database, your app stores it locally. This is the ONLY time they communicate about the secret.
The first “T” in TOTP stands for “Time-based”. TOTP usually refreshes every 30s.
Current Time: 1707912345 (Unix timestamp in seconds)
Divide by 30: 56930411 (This is our counter)Every 30 seconds, this counter increments by 1.
Why 30 seconds? It’s a balance to get a counter.
Now we need to combine the secret and the counter in a way that:
Can’t be reversed (you can’t figure out the secret from the code)
Is deterministic (same inputs = same output)
Is practically impossible to predict future codes
This is where HMAC-SHA1 comes in. It’s a cryptographic hash function.
Secret Key + Counter → HMAC-SHA1 → 20-byte hash
Example:
Secret: JBSWY3DPEHPK3PXP
Counter: 56930411
Hash: 1f8698690e02ca16618550ef7f19da8e945b555a
We have a 20-byte hash, but we need a 6-digit number. Can we just take the first 6 digits? No! That would be predictable.
Instead, we use the “dynamic truncation” - a fancy way of saying we pick a spot in the hash based on the hash itself:
Hash: 1f 86 98 69 0e 02 ca 16 61 85 50 ef 7f 19 da 8e 94 5b 55 5a

Last byte: 5a → Last 4 bits: 0xa (10 in decimal)
So we start at position 10 (0-indexed)

Extract 4 bytes starting at position 10:
Bytes: 50 ef 7f 19
Binary: 01010000 11101111 01111111 00011001
Integer: 1358806809

Take last 6 digits: 806809
The complete flow
┌─────────────────────────────────────────────────────┐
│                    USER'S APP                       │
│  Secret: JBSWY3DPEHPK3PXP (stored locally)          │
└─────────────────────────────────────────────────────┘
                        ↓
        ┌───────────────────────────────┐
        │  Current Time: 1707912345     │
        │  Counter: 1707912345 / 30     │
        │         = 56930411            │
        └───────────────────────────────┘
                        ↓
        ┌───────────────────────────────┐
        │  HMAC-SHA1(secret, counter)   │
        │  = 20-byte hash               │
        └───────────────────────────────┘
                        ↓
        ┌───────────────────────────────┐
        │  Dynamic Truncation           │
        │  → 6-digit code: 806809       │
        └───────────────────────────────┘
                        ↓
┌─────────────────────────────────────────────────────┐
│                   SERVER                            │
│  (Does EXACT same calculation)                      │
│  Secret: JBSWY3DPEHPK3PXP (in database)             │
│  Code: 806809 ✅ Match!                             │
└─────────────────────────────────────────────────────┘
What about the QR code?
So how does the secret get from the server to your app? QR codes!
The decode to the URL of the following format:
otpauth://totp/GitHub:john@example.com?secret=JBSWY3DPEHPK3PXP&issuer=GitHub
Let’s break this down:
otpauth://- URI scheme (tells apps this is for authentication)totp- Type (TOTP vs HOTP which is counter-based)GitHub:john@example.com- Label (shown in your app)secret=JBSWY3DPEHPK3PXP- The shared secretissuer=GitHub- Who’s providing the service
Optional parameters you might see:
algorithm=SHA1(or SHA256, SHA512)digits=6(or 8)period=30(time window in seconds)
Some applications let you set up the 2FA manually and show you the secret instead.
Now knowing the theory, let’s start building our app. it could be a CLI app, but why not to have a nice looking desktop app using Wails?
Project setup
We are only implementing the client side in this video, and will use external service as a server, for example totp.app
I chose Vue.js and Typescript.
go install github.com/wailsapp/wails/v2/cmd/wails@latest

wails init -n mfaclient -t vue-ts
cd mfaclient
wails dev
Wails will generate some code for us, not much luckily, it’s still easy to navigate:
mfaclient/
├── app.go              # Main application logic
├── main.go             # Entry point
├── totp.go             # TOTP generation logic
├── storage.go          # Encrypted storage for accounts
├── frontend/App.vue.   # Our Vue frontend
└── wails.json
Go implementation of TOTP
The implementation will follow the algorithm described above and is quite straightforward. As you can see we only use the Go’s standard library.
totp.go
package main

import (
	"crypto/hmac"
	"crypto/sha1"
	"encoding/base32"
	"encoding/binary"
	"fmt"
	"strings"
	"time"
)

func GenerateTotp(secret string) (string, int, error) {
	now := time.Now()

	counter := getCounter(now)

	hash, err := calculateHash(secret, counter)
	if err != nil {
		return "", 0, err
	}

	code := truncate(hash)

	remaining := 30 - (int(now.Unix()) % 30)

	return fmt.Sprintf("%d", code), remaining, nil
}

func getCounter(t time.Time) uint64 {
	return uint64(t.Unix()) / 30
}

func calculateHash(secret string, counter uint64) ([]byte, error) {
	secret = strings.ReplaceAll(secret, " ", "")
	secret = strings.TrimRight(secret, "=")
	secret = strings.ToUpper(secret)

	key, err := base32.StdEncoding.WithPadding(base32.NoPadding).DecodeString(secret)
	if err != nil {
		return nil, err
	}

	buf := make([]byte, 8)
	binary.BigEndian.PutUint64(buf, counter)

	h := hmac.New(sha1.New, key)
	h.Write(buf)

	return h.Sum(nil), nil
}

func truncate(hash []byte) int {
	offset := hash[len(hash)-1] & 0x0f

	code := int(hash[offset]&0x7f)<<24 |
		int(hash[offset+1])<<16 |
		int(hash[offset+2])<<8 |
		int(hash[offset+3])

	return code % 1000000
}
The only hacky part that is there is the truncate function, which does some bit manipulation to get an integer.
Having this part coded, we can start thinking about how to store the 2FA accounts locally. And there are endless options here, we could store them in the database, could encrypt them and so forth. To make it simple for now, let’s store them into a plain JSON file locally.
storage.go
package main

import (
	"crypto/rand"
	"encoding/hex"
	"encoding/json"
	"os"
)

type Account struct {
	Id     string `json:"id"`
	Issuer string `json:"issuer"`
	Secret string `json:"secret"`
}

type Storage struct {
	Filepath string
}

func generateID() string {
	bytes := make([]byte, 8)
	rand.Read(bytes)
	return hex.EncodeToString(bytes)
}

func (s *Storage) save(accounts []Account) error {
	data, err := json.Marshal(accounts)
	if err != nil {
		return err
	}

	return os.WriteFile(s.Filepath, data, 0o600)
}

func (s *Storage) LoadAccounts() ([]Account, error) {
	data, err := os.ReadFile(s.Filepath)
	if err != nil {
		if os.IsNotExist(err) {
			return []Account{}, nil
		}

		return nil, err
	}

	var accounts []Account
	json.Unmarshal(data, &accounts)
	return accounts, nil
}

func (s *Storage) AddAccount(a Account) error {
	accounts, err := s.LoadAccounts()
	if err != nil {
		return err
	}

	a.Id = generateID()
	accounts = append(accounts, a)
	return s.save(accounts)
}

func (s *Storage) DeleteAccount(id string) error {
	accounts, err := s.LoadAccounts()
	if err != nil {
		return err
	}

	filtered := []Account{}
	for _, acc := range accounts {
		if acc.Id != id {
			filtered = append(filtered, acc)
		}
	}

	return s.save(filtered)
}
Hooking up with frontend
Once backend Go part is ready we can start exposing these methods as bindings from app.go and use them in frontend/App.vue
I will not share the whole code, you can see the link at the end of the article.
But developing the Wails frontend feels very similar to developing in Vue on the web, here is the snippet from our App.vue:
<script lang="ts" setup>
import { ref, onMounted, onUnmounted } from "vue";
import { GetAccounts, AddAccount, DeleteAccount } from "../wailsjs/go/main/App";
import { main } from "../wailsjs/go/models";

const accounts = ref<main.AccountWithCode[]>([]);
const error = ref("");
const showForm = ref(false);
const issuer = ref("");
const secret = ref("");
const addError = ref("");
const copiedId = ref("");

// ...
Testing
Secrets are always distributed in base32 format, so let’s generate one random first:
openssl rand -hex 10 | base32Wails has a nice dev mode where it compiles all the parts of the app and has a hot reload for all components, be it backend or frontend.
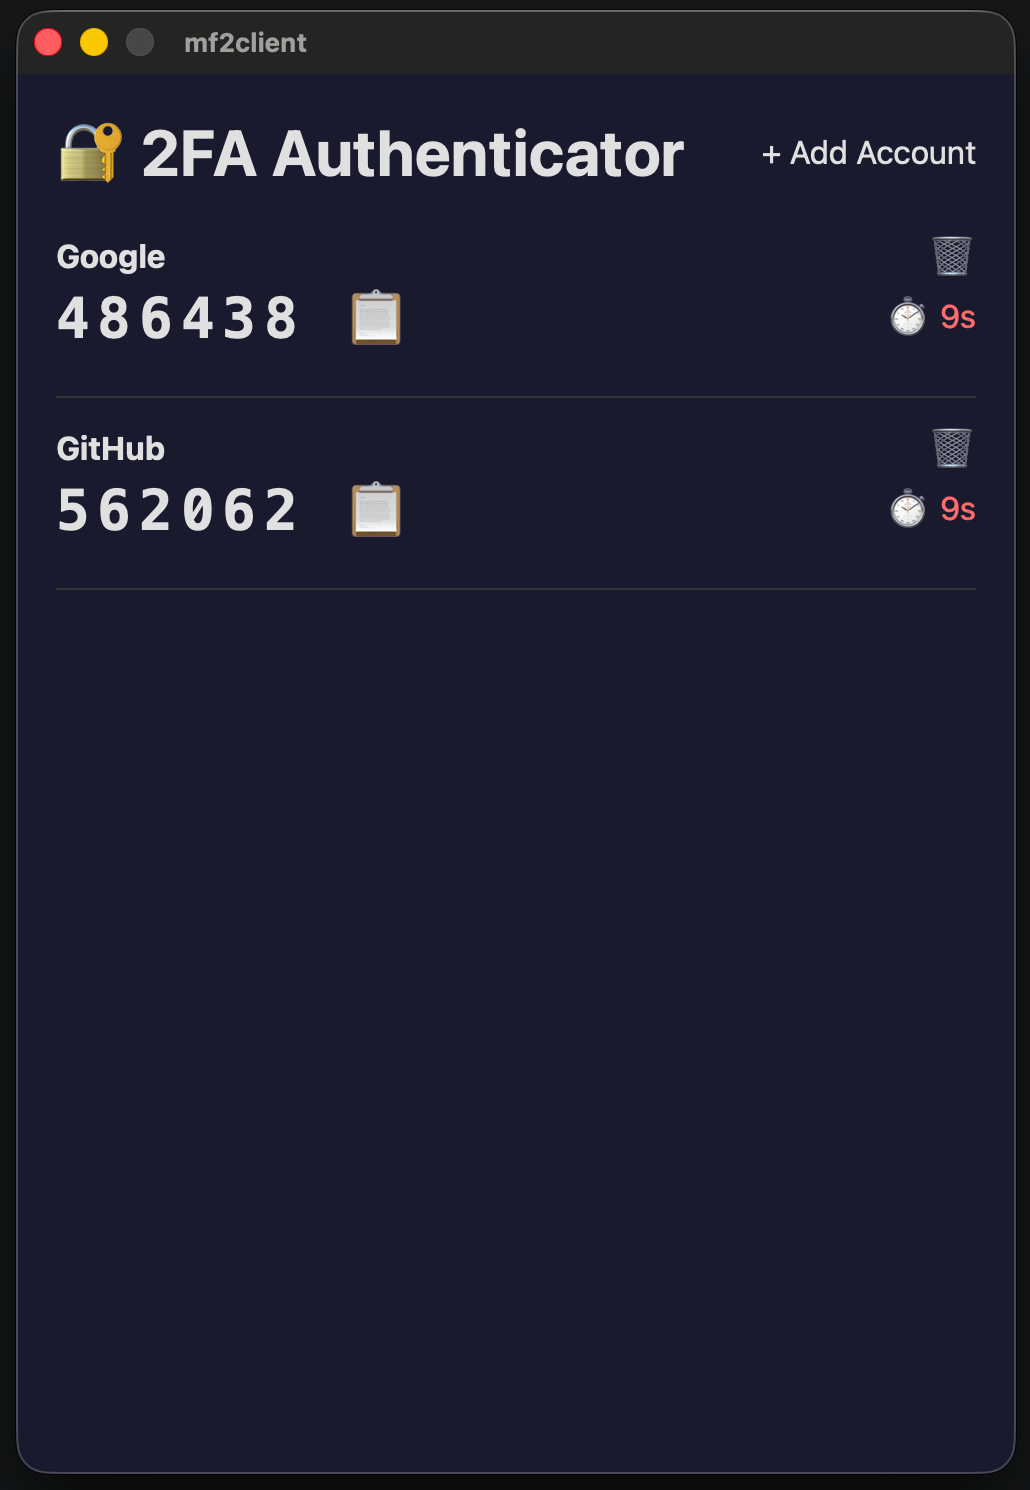
wails devNow we can see our shiny app is working and generating the valid TOTP codes. We confirm it by using the same secrets on totp.app
We could also test it on a real service, but I suggest not trying it yet with your real accounts. Instead, you can run something like Keycloak locally.
docker run -p 8080:8080 -e KEYCLOAK_ADMIN=admin -e KEYCLOAK_ADMIN_PASSWORD=admin quay.io/keycloak/keycloak:latest start-devConclusion
Obviously this can be compiled so we have everything in a single binary.
wails buildThis app needs many improvements such as: better UI, more secure account storage, support for different algorithms.
Otherwise Wails has proven once again to be a simple library to build lightweight desktop apps.
Links: